Showing posts with label greens. Show all posts

Wednesday, October 19, 2016

Moroccan Spiced Chili & Green Tomato Zhoug

All summer I witness friends from all parts of the globe gush over the hot weather while I hide under hats and try to survive the heat. The shift to cool weather brings me great relief and ironically, warms my heart and my kitchen.  I love bundling up in scarves and cozy sweaters and shifting from the refreshing cold salads and meals of summer to the steamy stews of fall and winter. This recipe is rich in spices and a huge hit (with kids and adults) every time I make it.  Last winter I cooked this recipe on the TV show CT Style to promote the CitySeed Winter Farmers' Market, and locally grown foods (the meat, canned tomatoes, cooking greens, onions and squash were all available from CT farms through the winter months).  This is one of those recipes that people always ask me for while they're eating it, so it's about time I shared it here. 

Last week I cooked this up but left out the chili pepper so the younger kids at the table would eat it, but didn't want the rest of us to suffer for the lack of heat, so I made up a last minute spicy green tomato condiment to stir in.  It was one of those inventive moments where I lacked the main ingredients for a recipe (in this case, cilantro and parsley for the Yemeni condiment zhoug), but realized I had plenty of green cherry tomatoes in my garden which added a bright tanginess to the rich red spiced stew and transformed the sauce into an entirely new thing.  I'm including that recipe below as well.  


Moroccan Spiced Chili with Winter Vegetables
Recipe courtesy of CitySeed, Inc.

Ingredients
2 tablespoons olive oil
2 onions, finely diced
1 pound ground beef, lamb or small diced stew meat
4 garlic cloves, minced
4 teaspoons cinnamon
2 teaspoons ground cumin
2 teaspoons ground coriander
½ teaspoon hot red pepper flakes (or to taste)
2 teaspoons sea salt (or to taste)
One 28-ounce can diced tomatoes
½ cup French lentils (grey green lentils that do not mush when cooked, or substitute 1 can chickpeas)
1/2 small winter squash (such as butternut or acorn) cut into ½-inch cubes
2 cups water
2 cups frozen or fresh chopped greens such as spinach, collards or kale

Instructions
1.  In a large stockpot or Dutch oven, heat the oil. Brown the meat and break it into small pieces. As meat starts to brown add diced onion and sauté with meat until translucent. Add garlic and spices, continue cooking until fragrant, about 1 minute more.
2.  Add the tomatoes, water and lentils and stir, scrapping up any brown bits on the bottom of the pan. Simmer for 20 minutes. Add diced squash and simmer 20 minutes more or until squash is tender and lentils are cooked through. Add finely chopped greens and cook a few minutes more until tender. Adjust seasoning as needed. If you have the time, you can cook this chili slow and on low heat for a few hours, stirring occasionally, and adding the greens a few minutes before you are ready to serve. 
3. Optional: serve the chili with yogurt and cilantro or parsley (or the Green Tomato Zhoug below).


Green Tomato Zhoug
This spicy salsa type condiment is inspired by a Yemeni green sauce called zhoug which consists of garlic, chili peppers, cardamom, caraway seeds, cilantro and parsley, salt and olive oil. 

4 cloves garlic
Seeds from 3 green cardamom pods, ground (or 1/2 teaspoon ground cardamom)
1/2 teaspoon caraway seeds
1/2 teaspoon salt (or to taste)
1/2 small fresh chili pepper or dried chili to taste
8 green cherry tomatoes or 2 green tomatoes

Using a mortar and pestle or a food processor, first grind the garlic, salt and spices into a paste. Quarter cherry tomatoes or chop the large tomatoes, add to the garlic paste and pound or pulse until the desired texture is reached. Adjust seasoning as desired. 

Do you have a favorite chili recipe? Please share below!


Saturday, September 27, 2014

Pizza from the Garden

When I pass pizza dough in the Italian market or even the whole wheat ones at Trader Joe's it is often hard for me to resist. I love making my own dough, but this bag of pre-made dough makes for a super quick weeknight dinner and is so much cheaper than ordering pizza.

Pizza From the Garden
To make Pizza, put the cold dough onto a well oiled sheet pan and cover with plastic wrap. let sit in a warm area until it is very soft and has risen considerably. Press the dough out to the edges of the pan with your finger tips. Top with whatever you like and bake in a preheated 400 degree oven.

The pizza pictured is rubbed with olive oil, dotted with fresh ricotta cheese, herbs, finely chopped kale, and sliced tomatoes from the garden (big red onions and tiny sun gold cherry tomatoes) and sprinkled with some Pecorino Romano cheese.  Bake until golden on the edges, rotating pans to different racks in the oven as needed to cook the bottoms and tops evenly.

Do you make pizza at home? What else do you do with pre-made pizza dough?

Friday, September 26, 2014

The End of Summer: Meals from the Garden


First I must apologize that it has been a long while since I have written anything for my blog. I have missed it, and missed sharing food and thoughts with you all. I have been trying to create more balance and joy in my life and staying off my computer and spending more time with family and doing things like art and dance have been key to that shift. Writing and blogging about food also bring me so much joy, so now, I am getting started again so stay tuned for more posts and let me know if there is anything you are wanting to hear/learn about. 

Since it has been a while, I thought it would be nice to share what has gone in my garden all summer. As usually it is an over crowded and weedy (but productive) bunch of raised beds and a beautiful tangle of tomato plants I generally refer to as the "Tomato Forest". In spring I can never believe that the tomato plants will actually get as large as they do, and want to plant as many of them as possible. 

Mostly we eat copious amounts of salad from our garden, fresh greens, cucumbers, numerous kinds of tomatoes and herbs, but there are occasional zucchini heavy cooked recipes and many kinds of raw or cooked kale dishes like the Pumpkin Seed Pesto Pasta below and the Pizza from the Garden here. I hope you all have had a rejuvenating summer and gotten to eat some delicious food along the way. It is nice to be back. - Tagan

Dinner on the front stoop: in the summer our dinning table grows into a family game table/paper collection spot, and all meals take place outside. At dusk the backyard often has too many mosquitos (yes there are mosquitos in the city) so we often eat on the front stoop, dragging out big bowls of food and cold bottles of water, on occasion our cutting board makes it out there piled with fresh sliced deliciousness from the garden, making us feel rich in it's abundance. 

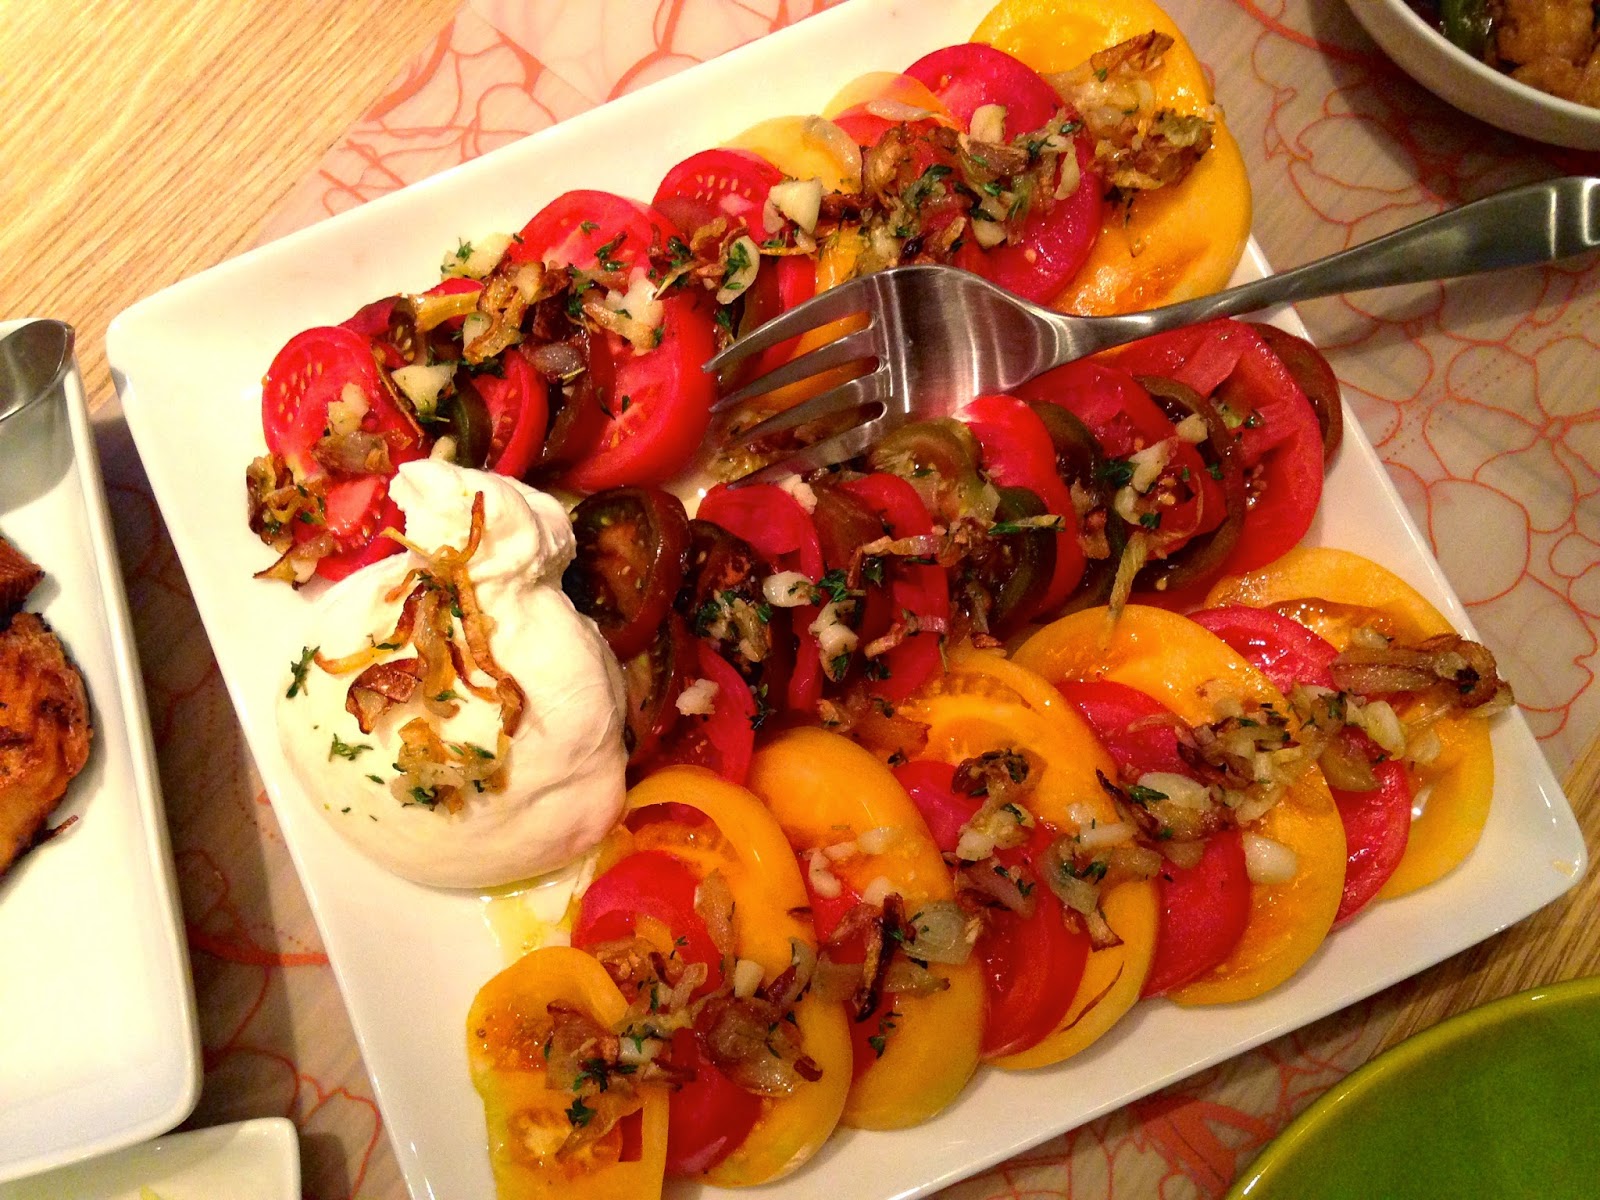
Sliced Tomatoes with Crispy Onions and Garlic: cook onions over medium low heat in plenty of oil and salt until light golden, add garlic cook until tender and onions are nicely browned, drizzle over fresh cut tomatoes, serve with anything.


 Pumpkinseed Pesto (below with Kale and Pasta): Finely chop or puree toasted pumpkin seeds, good olive oil and a little salt, add basil and any other greens you have (kale is good but has a strong flavor, spinach is great as it has a mild flavor and makes a bright green pesto), pulse or chop until you have a fine paste. Add either finely grated cheese (Romano is my favorite) or miso if you don't want dairy, add a little lemon zest and adjust the salt and pepper and you are done. Obviously pesto is great on pasta, but it's also great with eggs and on toast.

One last gem are the little pumpkins and gourds that volunteered themselves from our compost this year. We spread the seedlings around the garden in spring and wondered what kind of squash would appear, amazingly we got little oval pumpkins, ghost white gourds and carnival squash.

A gift from the garden, and pure joy for the family. When I look out the window onto my backyard garden I am overcome with gratitude for the food it provides and the blessing of this little piece of land in my life. 

If you have a garden or dream of one, please share your favorite foods...

Friday, June 7, 2013

Salad with Strawberries, Goat Cheese and Salt & Pepper Almonds

Sweet is usually the direction I go when it comes to strawberries, but these gorgeous berries are also delicious with herbs, cheese or just on a simple salad. As my contribution to a four family picnic I tossed together this salad with some beautiful strawberries, fresh goat cheese, salt and pepper almonds and a basil tarragon vinaigrette. The flavors and textures in this salad are wonderful, and it's a little healthier than strawberry shortcake....

Salad with Strawberries, Goat Cheese and Salt & Pepper Almonds
with Basil Tarragon Vinaigrette

One large head red leaf lettuce washed, dried and torn
1 pint strawberries, cleaned and sliced
4 oz of fresh chevre goat cheese (or feta)
1/2 cup whole raw almonds
1 tablespoon butter
salt and peppe

To make Salt & Pepper Almonds:
Heat a heavy bottomed skillet, add butter. Over medium heat toss in almonds, salt and freshly ground pepper. Cook, stirring occasionally until almonds are starting to brown, but not burn. Let cool.

To make Basil Tarragon Vinaigrette:
1/2 cup extra virgin olive oil
3 tablespoons vinegar (white, white balsamic or apple cider is fine)
Salt and pepper to taste
1 teaspoon sugar, honey or agave
handful each of basil and tarragon, finely chopped

Whisk all ingredients together or shake well in a jar.

To assemble salad:
Toss lettuce with dressing. Top with almonds, strawberries and crumbled goat cheese.

Enjoy!!!  

If you want to go pick some berries, check out: pickyourown.org or in CT try: buyctgrown.com
My favorite strawberry picking spot is: jonesfamilyfarms.com in Shelton, CT

What savory dishes do you make with strawberries?

Tuesday, November 20, 2012

Thanksgiving Food Musings and a Beautiful Bird

I have been hosting Thanksgiving for the past few years, which means that I have been in charge of the Turkey. Each year I have tried a different type of bird, and a few different cooking techniques, but for the last two years, I used the same technique and ended up with a deliciously moist bird cooked in only 2 hours. Two tricks that I think made all the difference: slather tons of garlic pureed with butter or oil and herbs under the skin and on top of the skin, and start with a high heat to brown the bird (in the bottom part of the oven, and then turn the temperature down a bit to cook the rest of the bird, draping the breast with foil if it is getting too dark before the rest of the turkey is done. For the last two years, my turkey has cooked in half the time I had calculated based on it's weigh, and I've had to scramble to get the rest of the meal on the table before the bird was cold. I write this in hopes that I will remember for this year!

I never posted my pictures from last year, so I thought this might be a good time to share. It was a fairly traditional year as far as side dishes and seasoning goes. I'm including links to some good recipes on my blog and in other locations:

Garlic and Herb Roasted Turkey (below)
Mashed Potatoes*
Buttermilk Biscuits
Kale Salad
Roasted Squash and Brussel Sprouts with Pecans
Caraway Roasted Rainbow Carrots (harvested that morning from my own garden!!)

I went a little nuts on dessert:
Raspberry Pie
Cardamom Buttermilk Pie (I topped mine with whipped cream just before serving)
Coconut Cream Pie
Apple Pear Pie
Pumpkin Pie (using a fresh pumpkin)

*Note on Mashed Potatoes: this linked recipe is a basic starting point. I would add a total of 4 tablespoons of butter and I boil my potatoes in the skin and peel them hot using a dish towel, then place them directly in the mixer or ricer, adding salt, hot mik and butter until they are fluffy. 1 

Perfect Roasted Turkey
1 Turkey (about 15-18 pounds)- at room temperature
1 stick butter or 1/4 cup olive oil
8 cloves garlic
1 small onion
salt and pepper
herbs or spices of your choosing

  1. Preheat oven to 450 degrees.
  2. Puree garlic, onion, salt and pepper with butter or olive oil.
  3. Loosen the skin on the turkey with your hands or a spoon.
  4. Smear garlic puree under the skin, reserving a few tablespoons to rub on the outside of the turkey skin.
  5. Tie turkey legs together with twin or string
  6. Place turkey in a large roasting pan breast side up and place in the oven on the bottom rack. 
  7. Roast at 450 until the skin is nicely browned, roughly 45 minutes to 1 hour. Turn oven down to 350 and continue roasting until turkey meat reaches 170 degrees when tested with a thermometer, approximately 1 more hour. 


This year I am thinking of going a little lighter all around. Contemplating poached pears and fruit based desserts rather than so many pies (the picture above is missing a few pies form our meal last year), and a lot of vegetables again....we'll see if people let me skip the biscuits or not....

I came across this paragraph I wrote last year about the joys of growing and eating my own food. It was an incredible experience to have a large harvest of one crop from my tiny backyard garden and get to share it with my family.


"Growing food in my backyard is an absolutely thrilling experience. To think that I put these tiny little seeds in dirt, let the sun shine on them, give them a little water, and try to keep the squirrels, stray cats and children from destroying them, and a few weeks or months later I have food. Such was the case with 2 raised beds of carrots. Now, carrots take a heck of a long time to grow (70-90 days), so it is amazing to me that they are so inexpensive in the grocery store. This crop took up two halves of raised beds; some precious garden real estate. The great thing is that I planted them so long ago that I'd almost forgotten about them. I'd been saving them for our Thanksgiving meal, and almost forgot to pick them. I sent the kids out on Thanksgiving morning to pull some of the carrots we'd been eyeing for months. The next 30 minutes was filled with kids racing in and out of the house showing us the fat danvers orange carrots, and the assortment of rainbow carrots, skinny white ones, stumpy purples, golden yellows and oranges. The kitchen floor was covered in dirt and brown leaves, the picnic table outside was piled high with carrots (greens and all), and I was filled with an inexplicable joy, both that my kids were taking such pleasure in a vegetable, and that I actually managed to grow something so beautiful and delicious. There was no need to remind myself to be thankful on this Thanksgiving."

 Any Favorite Thanksgiving Recipes you want to share?

Tuesday, July 10, 2012

Kale Crazy

Among the healthy/ local food focused community there seems to be a bit of a recent infatuation with kale: cooked, raw or turned into chips. It's a leafy green, and is very green, so therefore really good for you, and it's also easy to prepare, you don't even have to cook it. I know, I didn't really believe it would taste good raw either, until I tried it. Kale, chopped and  "massaged" with a little olive oil, salt and lemon juice....and anything else you'd like is tender and delicious. My recent favorite version was kale tossed with a creamy avocado dressing made by blending an avocado with the juice and zest of a lemon, and some salt and pepper, topped with some toasted almonds. Simple and delicious, and nutritious, because it actually tasted great, so people ate it!

For the salad pictured above, I tossed the kale with olive oil, lemon juice and a pinch of salt and pepper, then topped it with diced avocado and roasted pumpkin seeds. 

To prepare the salad, take one large bunch of kale and remove the thick part of the stems.  Roughly chop or tear the kale into 2-inch pieces. Toss with your favorite dressing or just a squeeze of lemon juice, oil and a pinch of salt which helps to tenderize the greens. Gently squeeze the greens with your hands as you toss. This salad is delicious with nuts or seeds, cheese, or other vegetables such as bell peppers or thinly sliced red onion. 

Enjoy!

Any favorite kale recipes? Please Share!


Saturday, April 21, 2012

Eating Wild


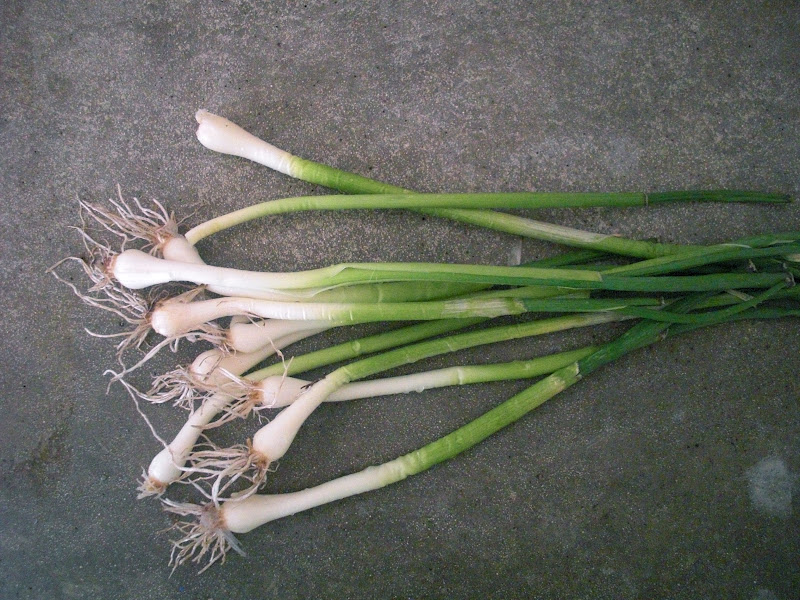
Onion grass - picked form my front yard and washed, looks a lot like scallions, but free!

As the weather has turned warm and life has begun to move outside, my urge to eat from the earth right outside my back door has emerged with force. My little garden is not growing much of anything yet, just a few seedlings started indoors, but as I wandered along the sidewalk and yard thinking of dinner, I started to notice food growing wild underfoot. New spring dandelions with their tender green leaves, perfect for a salad, and clusters of potent onion grass just waiting to be dug up from my unkept "lawn".  I hear people talking about foraging for ramps or wild mushrooms, but both of those involve a trip to the woods, (a welcome adventure, don't get me wrong), but not as convenient as my front stoop. So, I rallied my kids and we started digging and cutting, first showing them how to identify the dandelion greens with their distinctive jagged edges, and then the onion grass with it's unmistakable smell. They had a blast picking with me, and were so excited to share the food with our extended family for a special dinner that night.


Dandelion greens - still small and tender - (above)


Onion grass sprouting up in my front yard, the hollow stem and strong onion smell are unmistakable (above + below)

When picking wild plants be sure that you are 100% certain that you know what it is you are harvesting, so that you don't eat something poisonous. These two plants are pretty simple to identify, but please always know what it is you are putting in your mouth before you eat it! Also, be certain that the soil where you are picking is not contaminated or been treated with pesticides or toxic fertilizers.


For dinner we made Broiled Wild Salmon on a bed of french lentils and roasted wild onions, topped with super local dandelion greens and a dijon dressing. Delicious!


Dandelion Greens Salad
Dandelion Greens - large salad spinner full
1 clove garlic
1 teaspoon dijon mustard
3 tablespoons vinegar
1 teaspoon honey or sugar
1/2 teaspooon salt
pepper to taste
1/3 cup olive oil
  1. Wash and dry dandelion greens.
  2. Finely chop garlic clove. Whisk garlic, mustard, vinegar, honey, salt and pepper together. Slowly drizzle in oil, whisking continuously. 
  3. Toss over greens just before serving. Taste and adjust seasoning.
Roasted wild onions
1 handful of wild onion grass, including bulbs.
olive oil
salt and pepper
  1. Trim roots from onion bulbs and remove any brown or tough parts of stem and grass. 
  2. Toss onions with a drizzle of olive oil. Season with salt and pepper.
  3. Place onions in a single layer on a baking sheet directly under the broiler for a very brief time until browned but not burned. 
  4. Roughly chop roasted onions and add to any dish.
Note: The french lentils in the photo above were simmered in a large pot of water with a little salt. Once tender, drain the excess water, and toss with roasted onions and a drizzle of olive oil. Adjust seasoning as desired. The salmon was rubbed with olive oil, salt, pepper and lemon juice and cooked under the broiler, until cooked through but still moist. The fish was prepared about one hour before the meal and served at room temperature. 

Have you found any good wild edibles this spring?

Wednesday, January 25, 2012

Sizzling Rice Soup at Home


I first had sizzling rice soup when I followed my heart out to the Bay Area, CA the summer after my freshman year of college in the early 90's. On a sunny summer afternoon I was treated to a wonderful lunch at a great Chinese restaurant, and was served my first bowl of steaming sizzling rice soup. The strong memory of the rice crackling & sizzling when it hit the hot soup, and the texture of the chewy rice with the flavorful broth, lingers still. I'd eaten quite a bit of Chinese food in my life, but this soup didn't seem to have made it to the east coast in the early 90's, at least not anywhere I had been. I loved it, and 20 years later (wow!!) that is just about all I remember of the whole meal.

I have seen sizzling rice soup on a few east coast menus, but it's still not common east coast restaurant fare. A year or so ago, while in one of the many good asian markets, I am very thankful exist in New Haven, I saw this package of "instant sizzling rice", I snatched it up, brought it home, and it sat in my cabinet for over a year. Since funds have been low recently, I have needed to cook my way through every random ingredient and dry bean in my cabinet, so eventually I got to these.

It had not occurred to me until I googled sizzling rice soup just before starting dinner, that the rice needs to be deep fried before being added to the soup. I may not have bought it if I had known, but I had it, and a bit of oil too, so why not. They cook up in about 15 seconds, and the oil needs to be seriously hot, about 450 degrees, so the rice doesn't absorb much oil.

Sizzling rice cakes originated as the dry crispy rice stuck on the bottom of a cooking pot. Many rice-loving cultures have a name or dish for this crispy delicious rice. In Dominican communities it is called Concón, another fabulous culinary creation. 

For this soup I just made a simple clear broth soup with some turkey stock that was in the freezer from Thanksgiving. I added some slices of ginger, a little soy sauce, kale, tofu and some sweet potato. I sprinkled some delicious sambar curry powder on the crispy rice before adding it to the soup. Totally not traditional sizzling rice soup, but it was good and fun. 

Do you have any good winter soups that you love? Or Chinese New Year treats you want to share?

Tuesday, November 8, 2011

Braised Kale with Tomato

A few years ago I was shopping at the US 1 Caribbean Market and saw this woman stuffing huge bunches of kale into bags, filling her cart. At the time I had just finished the arduous process of collecting recipes for the New Haven Cooks cookbook and had been asking people across the city for their favorite recipes featuring vegetables and fruits. It was shocking how many people sent me a chicken recipe, dip, or fried seafood recipe with not a thought to vegetables, no less one in the ingredient list. So the site of a woman joyfully filling her cart with the largest bunches of kale I had ever seen made my heart race a bit, and I just had to know what she was planning to do with them.

She may have thought I was a little crazy, nosing around in her shopping cart, but she smiled and told me that she cooks her kale with lots of onion, garlic, tomato and a little hot pepper. I didn't get much more detail than that. I'd bet if I'd gotten to stand next to her at the stove, there might have been some other key ingredient like allspice berries, smokey paprika, or vinegar....I guess I'll never know, but she inspired me to start cooking my greens with tomato, and the rest I leave up to my imagination...

This is a great dish for fall and winter. You can use any type of kale, or even collard greens.

Braised Kale with Tomato
1 large bunch kale 
1 medium onion
3 cloves garlic
1 -15oz can diced tomatoes, or fresh tomatoes, chopped
1 small hot pepper, seeds removed or 1/4 teaspoon red pepper flakes
3 tablespoons olive oil
Salt and pepper - to taste

 
Optional ingredients: allspice berries, smokey paprika or ground chipotle, vinegar.

1. Wash Kale. Slice kale into 1/2inch strips. discard thick part of stem at the bottom of the bunch. Cut across the strips a few times to shorten the pieces. 

2. Cut the onion into a small dice or fine julienne, sauté in olive oil with salt and pepper over medium heat until translucent. Finely chop the garlic and add to the pan. Add hot pepper or spices if using, sauté until fragrant, do not allow garlic to brown. 

3. Add diced tomato to the pan, bring to a simmer. If using vinegar, add it now. Taste broth and adjust seasoning. Add kale and stir to coat. Cover pan and simmer for 5 minutes. Check kale for tenderness and adjust seasoning.

I generally cook my greens for a short time to retain as much of their nutrients as possible. Taste the greens after 5 minutes to determine if you like them this way or want to cook them a little longer.


How do you like to cook kale?
Please share below!

Friday, January 14, 2011

Black Beans and Sneaky Greens


So, finally here it is, the long awaited recipe for Black Beans with Sneaky Greens. This is a great versatile recipe. It is easy and very inexpensive to throw together a big pot of flavorful beans that can be served as a soup, in tacos, with arepas, over rice with a fried egg, or add some diced tomato and hot pepper to spice it up a bit. Cooked beans freeze well, so if you make a large pot full, try freezing a few portions for a quick weeknight meal in the future.

Black Beans with Sneaky Greens *
2 large onion or 4 cups coarsely chopped
8 cloves garlic peeled
1 1/2 tablespoon salt
3 tablespoons oil
16 cups water
4 cups dried black beans
4 cups finely chopped kale, collards or spinach (large stems removed)
  1. In a blender or food processor, puree onions, garlic, oil and salt.
  2. In a medium soup pot over medium-low heat, saute the onion and garlic mixture until very fragrant and no longer raw smelling, about 15 minutes. Stir occasionally and be careful not to brown.
  3. Rinse beans and add to the pot along with the water.
  4. Simmer beans for 3 hours or until tender and the sauce has thickened. If it is very thick and the beans are still firm, add water. If the sauce is still thin but beans are tender, continue to simmer on very low heat until sauce has thickened. Stir occasionally to ensure that the beans do not stick to the bottom of the pan and burn. Once the beans are tender and the sauce thickened, add the chopped greens and simmer till tender, about 20 minutes for kale or collards, 4 minutes for spinach. Adjust seasoning with salt and pepper and serve.
*You do not need to soak the beans ahead of time to make this dish, and the taste improves when the beans are made a day or so ahead of time.

To make Tacos:
6" soft tortillas (flour or corn)
plain low fat yogurt
shredded lettuce
optional additions: hot sauce, onions, mojo sauce, grated cheese, salsa
  1. Warm tortillas
  2. Top with beans, yogurt and lettuce
  3. Enjoy
Quick and delicious condiment

I often make a quick and flavorful onion hot sauce to accompany my tacos: finely dice a small onion, squeeze the juice of one lime on top (or a few tablespoons of white vinegar if you don't have a lime), add a sprinkle of salt and sugar and some hot pepper, (either diced fresh pepper, red pepper flakes or a squeeze of hot sauce). Mix and let sit for 10 minutes to soften the onion. Spoon over tacos as desired. 

Here are some dishes I have made over this year clockwise from top left:
burrito with lime and hot sauce, arepas with lettuce and beans (this actually got a fried egg on to before it was eaten), garlic and kale rice topped with black beans and cheddar, broiled and then spooned over a roasted half of a poblano pepper.


 Are you cooking with beans these days? Please share your favorite dishes by commenting below!