I know this looks and sounds crazy, but trust me it is delicious! Take 1/2 a ripe avocado, mash it with a fork and scoop it into a small bowl. Add 1/2 cup RAW rolled oats, drizzle with molasses. Mix molasses into oats and enjoy the molasses covered oats and the rich creamy avocado together in each bite. I first ate this in Brazil deep in the countryside of Bahia in 1994. Avocados are eaten primarily as a sweet food there, the whole left by the pit filled with condensed milk, or fresh molasses; or blended into milk shakes called "vitaminas". Do yourself a favor and try this combination for breakfast, it is a huge favorite in our house!
Have you come across other fun and unusual breakfasts abroad?
As you may have discovered from my blog, I have a bit of a sweet tooth. This particular treat, Mochi or pounded sweet rice, rises above many in my heart, so much so that my husband started calling me "Mochi Lady" more than 13 years ago, and still does to this day. This post is rather long, which might give you an idea of just how much I love mochi. And, while the chewy, sticky texture of this lightly sweetened rice cake is not so familiar to most Americans, it is something worth exposing yourself too at least once!
Mochi is a not too sweet treat, made by people in almost every country in Asia, and is one of the foods eaten on Japanese and Chinese New Year, which are this month. Various types of cooked glutinous rice or sweet rice flour are pounded or mixed to make a sticky mochi dough which is most often filled with sweetened red bean paste, but may also have an assortment of fillings (like the ones I bought pictured above), with chopped peanuts and coconut, lotus seed, sesame paste, taro or other fillings. The red bean variety is often available in take-out sushi restaurants in the USA, as well as any Asian market in either the refrigerated or dry good self area.
The skillful process of pounding glutinous rice into mochi has become a bit of a spectacle, showing up on japanese game shows and tons of youtube videos, like the one below, keep watching to the end to see the incredible speed they hit!
Many years ago a friend of mine from the Philipines, knowing of my love of mochi, shared an incredible homemade treat made by her family back home, and sent to her in a care package. It was a seasonal specialty in the Philipines: early spring mochi made from the first grains of fresh green spring rice, pounded, sweetened and flattened between two sheets of plastic. It was an amazing, chewy, slightly sweet, nutty and fresh, handmade by her family and sent half way around the world. It was a gift I will never forget! I could not find any photos or recipes on google exactly like what I ate that day, but this is somewhat similar: How to Make Kalamay na Pinipig
Over the years I have made mochi at home only a few times. Once from fresh sweet rice which I soaked overnight, steamed and then "pounded" using the paddle attachment in my stand mixer. Last year, I decided to try using the Mochiko rice flour (pictured in the box at the top). I do not have a microwave, so followed the stovetop directions for cooking the mochi dough. Here is a good video for a Korean style mochi, and she shows how to make the red bean filling using adzuki beans.
Below are some pictures of my mochi making adventure with my kids, who share my love of mochi. First we made the red bean filling and scooped it into small balls ready for filling the mochi dough. Then made our dough from the glutinous rice flour, and tinted it pink with a few drops of food coloring.
Below: cutting the dough into 1 1/2 inch squares, then filling them with red bean paste, pinching the dough closed and rolling the mochi round and flat.
To make Red Bean Filling:
Put one cup of adzuki beans in a heavy pot with 3 cups of water, cover and bring to a boil over medium high heat for 10 minutes.
Lower heat and simmer for about 1½ hours.
If the beans haven’t softened after 1½ hours, add more water and cook over low heat until they are soft and can be well mashed.
Mash the beans with a wooden spoon (or food processor) until smooth.
Put the beans back into the pot and add ¾ cup light brown or raw sugar, ¼ tsp salt, 1 tsp vanilla extract, and 2-3 tbs rice or corn syrup.
Stir with a wooden spoon over low heat until the sugar is dissolved and the paste looks a little shiny.
Using spoons, divide the bean paste into one inch balls (or smaller depending on the size mochi you want to make.
To make Mochi:
Mochiko is the only brand of glutinous rice flour I have seen in the USA. You must use glutinous or sweet rice flour for this, regluar rice flour will not work. Most recipes online use a microwave, you can do that if you like. I made mine on the stove top and it was great.
3 Cups water
1 box (16oz or two cups) Mochiko glutinous rice flour
1/2 cup granulated sugar
pinch salt
2 drops food coloring if desired.
Put water, sugar, salt and food coloring in a pot and bring to a boil.
Stir in Mochiko flour and simmer stirring constantly, until the dough forms a thick smoth paste, about 3 minutes.
Sprinkle the counter with tapioca or corn starch and spread the dough our sprinkling the top with starch as well.
Cool and cut into squares for filling with red bean paste, or anything else you like. shredded coconut and peanuts are a great combination too!
Mochi must be eaten within a day or two, and should be kept at room temperature, it will get hard if refrigerated.
There are many other kinds of mochi, which if you decide you like it, you can start to discover. For Americans, there is this variety that you can find in most health food stores. I was raised eating this type, toasted and topped with a little butter and maple syrup, a New England twist.
I usually keep sweet rice or glutinous rice in the house, since when it is cooked or steamed you get sticky rice, which we love as well. It can be turned into little balls and sprinkled with sesame, or rice seasoning, which makes a great treat for little (or big) kids.
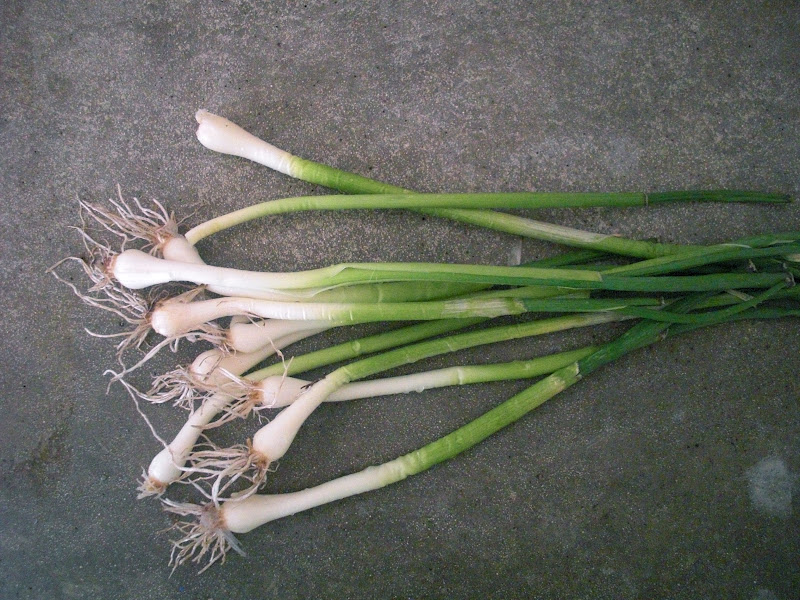
Onion grass - picked form my front yard and washed, looks a lot like scallions, but free!
As the weather has turned warm and life has begun to move outside, my urge to eat from the earth right outside my back door has emerged with force. My little garden is not growing much of anything yet, just a few seedlings started indoors, but as I wandered along the sidewalk and yard thinking of dinner, I started to notice food growing wild underfoot. New spring dandelions with their tender green leaves, perfect for a salad, and clusters of potent onion grass just waiting to be dug up from my unkept "lawn". I hear people talking about foraging for ramps or wild mushrooms, but both of those involve a trip to the woods, (a welcome adventure, don't get me wrong), but not as convenient as my front stoop. So, I rallied my kids and we started digging and cutting, first showing them how to identify the dandelion greens with their distinctive jagged edges, and then the onion grass with it's unmistakable smell. They had a blast picking with me, and were so excited to share the food with our extended family for a special dinner that night.
Dandelion greens - still small and tender - (above)
Onion grass sprouting up in my front yard, the hollow stem and strong onion smell are unmistakable (above + below)
When picking wild plants be sure that you are 100% certain that you know what it is you are harvesting, so that you don't eat something poisonous. These two plants are pretty simple to identify, but please always know what it is you are putting in your mouth before you eat it! Also, be certain that the soil where you are picking is not contaminated or been treated with pesticides or toxic fertilizers.
For dinner we made Broiled Wild Salmon on a bed of french lentils and
roasted wild onions, topped with super local dandelion greens and a
dijon dressing. Delicious!
Dandelion Greens Salad
Dandelion Greens - large salad spinner full
1 clove garlic
1 teaspoon dijon mustard
3 tablespoons vinegar
1 teaspoon honey or sugar
1/2 teaspooon salt
pepper to taste
1/3 cup olive oil
Wash and dry dandelion greens.
Finely chop garlic clove. Whisk garlic, mustard, vinegar, honey, salt and pepper together. Slowly drizzle in oil, whisking continuously.
Toss over greens just before serving. Taste and adjust seasoning.
Roasted wild onions
1 handful of wild onion grass, including bulbs.
olive oil
salt and pepper
Trim roots from onion bulbs and remove any brown or tough parts of stem and grass.
Toss onions with a drizzle of olive oil. Season with salt and pepper.
Place onions in a single layer on a baking sheet directly under the broiler for a very brief time until browned but not burned.
Roughly chop roasted onions and add to any dish.
Note: The french lentils in the photo above were simmered in a large pot of water with a little salt. Once tender, drain the excess water, and toss with roasted onions and a drizzle of olive oil. Adjust seasoning as desired. The salmon was rubbed with olive oil, salt, pepper and lemon juice and cooked under the broiler, until cooked through but still moist. The fish was prepared about one hour before the meal and served at room temperature.
I first had sizzling rice soup when I followed my heart out to the Bay Area, CA the summer after my freshman year of college in the early 90's. On a sunny summer afternoon I was treated to a wonderful lunch at a great Chinese restaurant, and was served my first bowl of steaming sizzling rice soup. The strong memory of the rice crackling & sizzling when it hit the hot soup, and the texture of the chewy rice with the flavorful broth, lingers still. I'd eaten quite a bit of Chinese food in my life, but this soup didn't seem to have made it to the east coast in the early 90's, at least not anywhere I had been. I loved it, and 20 years later (wow!!) that is just about all I remember of the whole meal.
I have seen sizzling rice soup on a few east coast menus, but it's still not common east coast restaurant fare. A year or so ago, while in one of the many good asian markets, I am very thankful exist in New Haven, I saw this package of "instant sizzling rice", I snatched it up, brought it home, and it sat in my cabinet for over a year. Since funds have been low recently, I have needed to cook my way through every random ingredient and dry bean in my cabinet, so eventually I got to these.
It had not occurred to me until I googled sizzling rice soup just before starting dinner, that the rice needs to be deep fried before being added to the soup. I may not have bought it if I had known, but I had it, and a bit of oil too, so why not. They cook up in about 15 seconds, and the oil needs to be seriously hot, about 450 degrees, so the rice doesn't absorb much oil.
Sizzling rice cakes originated as the dry crispy rice stuck on the bottom of a cooking pot. Many rice-loving cultures have a name or dish for this crispy delicious rice. In Dominican communities it is called Concón, another fabulous culinary creation.
For this soup I just made a simple clear broth soup with some turkey stock that was in the freezer from Thanksgiving. I added some slices of ginger, a little soy sauce, kale, tofu and some sweet potato. I sprinkled some delicious sambar curry powder on the crispy rice before adding it to the soup. Totally not traditional sizzling rice soup, but it was good and fun.
Do you have any good winter soups that you love? Or Chinese New Year treats you want to share?
Ok, I know I'm a little late for the look back on food in 2011, but as I scanned through my food photos from this year, there were a few great food spots I visited but never got the chance to share, so better late than never!
The menu at Saray is large. There is a great selection of cold appetizers (see photo above) which are on dsplay in the front case, such as baby eggplants stuffed with onion and garlic, red pepper and eggplant salad, hummus, and much more. The cold appetizer plate is great accompaniment to any meal (or a main course for vegetarians), although sadly, they no longer make one of my favorite spreads: muhamarah, a mix of walnuts, red pepper, pomegranate molasses and olive oil. The grill and bread oven at this large family friendly spot are always busy. Every meal is accompanied by their delicious hot, freshly made bread. Saray has a number of vegetarian dishes, and a few grilled fish items, but the most of the menu is packed with beef and lamb dishes: kebabs, ground meat, and shwarma style marinated/roasted and then sliced meat. I have found the ground meat and doner(shwarma) to be more flavorful than the cubed kebabs. While I don't generally eat meat that is not sustainably raised, I sometimes make exception for lamb, which I imagine (but do not know) is not as likely to be raised on feedlots as beef.
My favorite, and probably the most unhealthy dish on the menu is the Yogurtlu Doner Kebab - sauteed slices of marinated lamb and beef over hot buttered pieces of fresh bread topped with thick cool yogurt.
Most of the main courses are served with the same simple side dishes of seasoned rice, grilled tomato and pepper, but the various spreads from the appetizer selection add more flavor, and as a whole it's a nice meal.
The tea and spiced Turkish coffee are always nice, and there is a large selection of Turkish desserts with many baklavah style sweets, and a wonderful light custard with burnt sugar resembling flan called Kazandibi. Saray is a fun restaurant suitable for small or large groups, a romantic meal, or a dinner with kids. The menu is large, the food is good, and I think they have live music on weekends. The restaurant is located at 770 Campbell Ave in West Haven, just off I-95, so any of you passing through the area, shouldn't hesitate to make a quick detour.
Live Food.
If your mind conjured an image of you biting into a live fish, it's tail flapping water in your face, you can relax. When I talk about live food I mean plant based food that has the energy used to grow itself still inside of it. I know this might sound hokey, but compare a fresh green bean to one from a can, or think about how good a recently picked carrot is compared to one that's been sitting in your fridge for 2 weeks.
Live food is a little different from raw food, which may be uncooked, but not "living". As an example, an almond is raw if it has not been roasted, but an almond is a seed, and if you soak it in water over night it will start the process of sprouting and starting to grow into an almond tree, this makes it live, not just raw. I often hear myself telling my kids they need to eat something fresh so they can get "growing energy from their food", that they need to grow their own bodies. I like thinking about food this way, rather than just telling people to "eat their vegetables" I try to focus on eating enough fresh live food to balance out all the rest of the food in my diet. (Check out this fun recipe for Almond Milk using "live" almonds.
As for me, well I love carbs for breakfast. Toast, cereal, muffins, scones are all high on my list of favorite early morning eats. The thing is, if I eat too much of them I get tired. This summer during my dance camp vacation, I discovered a wonderful new breakfast treat that walks a perfect line between carbohydrate and live food, making it better balanced once it is digested, so I feel great after eating it, not ready for a nap.
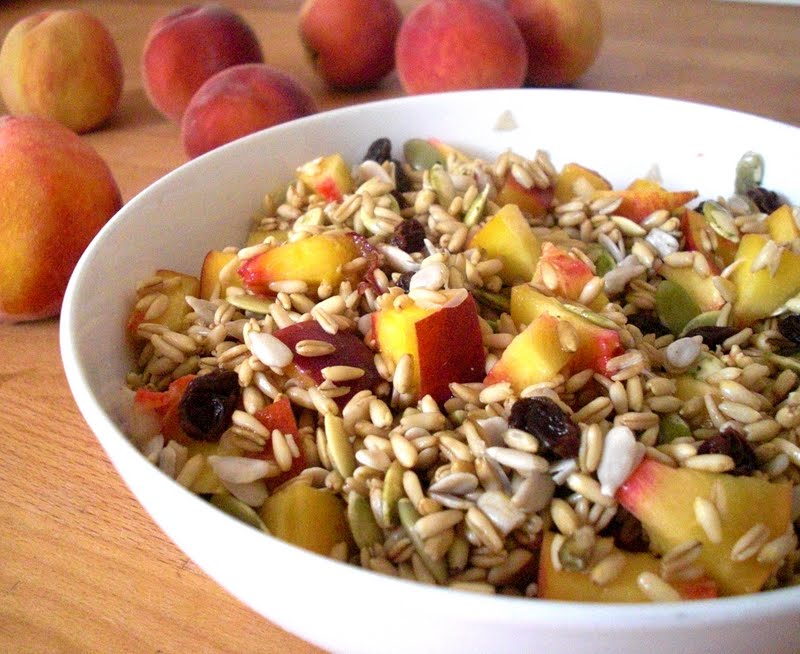
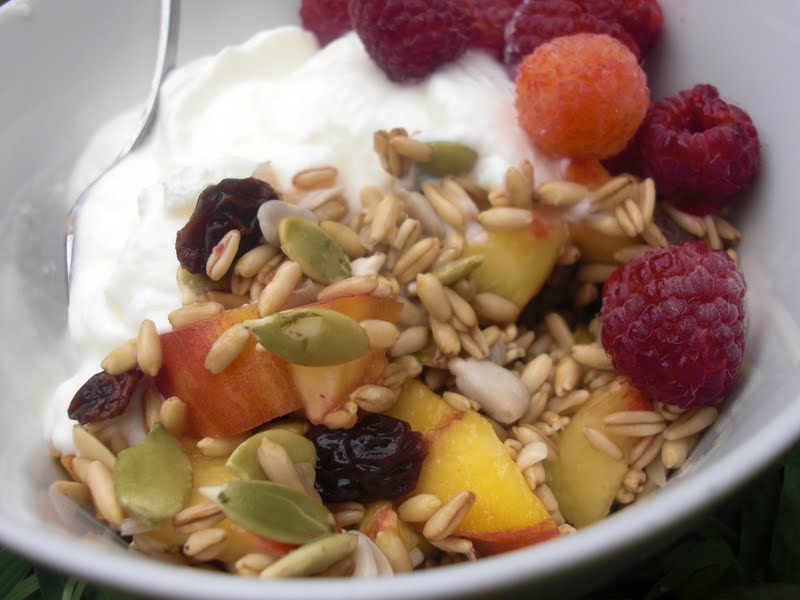
Live Museli, you are my new favorite breakfast!
Credit to one of the great Dance New England cooks (not sure which cook though...)
Live Museli
Makes 4 servings
1 Cup oat groats
1/4 Cup raw sunflower seeds
1/4 Cup raw pumpkin seeds
1/4 Cup raisins
1/4 Cup raw almonds
Fresh fruit such as peaches, plums, apples, pears or berries - (about 2 peaches or apples and or one cup of berries)
1. Place all ingredients except for fresh fruit into a bowl or pot. Fill the bowl or pot with water, about two inches above the grains. Cover with a towel or pot top and let sit over night or for 6-12 hours.
2. Drain off the water. Scoop about 1/2 a cup of the live grain/seed mixture into a bowl. Add some cut up fresh fruit, yogurt and honey are also nice additions if that sounds good to you.
note: I didn't have any almonds when I made this batch, but it is so much better with them!!
This breakfast always leaves me feeling satisfied and energized. I hope you enjoy it too!
I have never lived in Mexico, much to my dismay, but I have lived in Brooklyn, where Mexican, and Latin American cooking is alive and well. My first taste of this fabulous culinary creation was 7 years ago at the food carts by the soccer fields in Red Hook, Brooklyn. I still remember watching the corn being roasted on an open flame, slathered with mayonnaise, sprinkled with grated cheese and chili pepper and served with a wedge of lime. The combination was, and is addictive, and I have not stopped dreaming of it since.
Roasting corn on a gas stove or grill is quick, easy and fun. No boiling required. Top it with whatever you like, salsa, pesto, butter and salt, but before you reject the idea of mayonnaise on corn, please try this just once, you will be happy you did.
Mexican Roasted Corn
Fresh corn on the cob - shucked
Mayonnaise
Grated cheese - such as pecorino romano or parmesean, or from a latino grocery store.
Chili powder (optional)
Limes - cut into wedges
Place corn cob over grill or gas stove flame. Cook until some of the kernels begin to blister and brown. Turn corn until all sides are roasted.
Spread a thin coating of mayonnaise over a corn cob, sprinkle with grated cheese, a dash of chili powder and finish or serve with a wedge of lime. Eat immediately!
If this post gets you excited about roasting corn and not having to set a large pot of water to boil in triple digit heat, then check back soon for a wonderful recipe for roasted corn and peach salad.
Did you try roasting some corn? Let me know if you liked it!
A few years back this wonderful little bakery, Flour, popped up in Boston's South End. I'd heard about it and went for a visit and was truly delighted. A large assortment of interesting and finely crafted sweets and treats, not too sugary (except for their famous sticky buns). Among my favorites are some of their brioche based sweets, including a baked cream danish style treat, and a sugar dusted brioche bun, lemon custard muffins, cracklin'- a danish filled with bitter orange marmalade-topped with toasted almonds, home made oreos, fruit tarts piled high, buttery scones, chocolate glazed dacquoise, creme brulee, and so much more. On a recent trip to Boston, I was happy to discover that is wonderful bakery has grown to three locations: South End, Fort Point Channel and Central Sq., and I had the good fortune of eating from each of them in the 2 days I was there, Oy!!!
In addition to the wonderful desserts, the bakeries serve a number of savory items, but I must admit, I didn't even notice them, I was so busy looking at the sweets. Each bakery has a beautifully designed space with many creative and unique touches. Certainly worth a visit!
More on Boston:
We also stopped by the SoWa Market on sunday morning: farmers' market, craft market and food trucks. Not as packed as I'd hoped it would be, but a fun little adventure.
If you make it up to Beantown, you might also check out:
Foundry on Elm or Bella Luna - both spots feature exceptional food by my friend and talented Chef Sam Putnam.
Sevan's Middle Eastern Grocery, Watertown - great food, one of my favorites is their Muhamara - a spread made of walnuts, red pepper paste, pomegranate molasses and olive oil.
Porter Square Exchange - Japanese food court filled with inexpensive and tasty small restaurant stalls, Cambridge.
Super 88 Asian Grocery Stores - I heard rumor that some of the locations have closed, but these are incredible and very large Asian markets. They may have changed name, but it is worth searching out some of the great and large asian groceries in the Boston area.
My latest creation: A fabulous bilingual community cookbook featuring fresh fruits and vegetables. A project of CitySeed, available at City Farmers markets, on the CitySeed webiste, and locations around New Haven. Click on the photo for more information.